Search This Blog

Thursday, February 14, 2019

RE-CLEARING A FENCE ROW AND BURNING OFF THE GARDEN

The fence row between the goat pasture and the garden was cleaned and ready for fence over five years ago.  The materials were purchased and the fence was started on the other side of the pasture (the fence between my property and the neighbor).  A series of injuries, infections, recovery time and other factors beyond my control, made it impossible to proceed with the fence project.  Now, I am fully recovered and ready to build the fence.  However, during my down time, the brush and trees grew back, thicker than ever.  It is amazing how fast a cleared area left unattended can become a
thicket.

Last week, I went out with the chainsaw and cut the trees and brush.  It took a couple of afternoons, but it was good to finally see progress.  With lots of brush to burn, I planned to take Sunday and make a day of it. Unfortunately, Sunday was a damp day, making it harder to get a good fire going in green brush.  Progress was slow at best, then it began to rain in the afternoon.  With less than half of the brush burned, I had to stop for the day.

By Tuesday afternoon, the rain was over.  Bright sunshine and some wind dried things out a bit giving hope of finishing this part of the project.  I was not disappointed.  After work, I got the fire started and began dragging brush.  There was a lot of brush remaining so I had to keep moving at a pretty good pace, but by late afternoon it was down to just pushing in the unburnt ends and watching the fire.

Just before sundown,  with a little time on my hands I had the bright idea of burning off the garden.  Amazingly, so soon after several days of rain, the dead grass was dry enough and there was just enough.  The wind carried the fire through it for a fairly quick and reasonably clean burn.

At the end of the day, I was plenty tired, but truly satisfied to have visible signs of accomplishment toward not one, but two projects.  Soon, the fence building and garden tilling can begin.


Sunday, February 10, 2019

BATS IN MY BELFRY ? MAYBE NOT!

This may sound a little batty, but last Sunday (Feb. 20), I was enjoying the warm weather and taking the opportunity to work on the garden tiller.  Yes, T-shirt weather at the beginning of February.  Admittedly a little strange, but not at all batty.  Right?

While removing the engine from the tiller, I became a little distracted by a bird swooping and flapping nearby.  Still not batty enough?  Turns out it was not a bird at all.  It was a bat, fluttering about, tending to the business of catching mosquitoes and other flying bugs.

I normally see bats at my place a bit later in the spring.  Early to mid march is not unusual, but early February seems a bit strange.  It was a Red Bat, Lasiurus borealis.  These awesome little creatures migrate in in the spring and stay all summer before heading back south.  With climate change, the early appearance doesn't seem so much of a concern.  After all, I was outside wearing a T-shirt and the bat's food
source was abundantly present.

The thing that seems really strange to me is the time of day.  Though the Red Bat comes out earlier in the evening than most other bats, 3:00 in the afternoon, on a bright, partly cloudy day is really out of character.  Nonetheless, I watched this little character flapping and swooping for its prey for quite a while, and even managed to get pictures.  I continued to notice the flight and feeding through the afternoon until it finally became to dark for me to see.

Yes, it was a batty afternoon.  No belfry required!

Tuesday, January 29, 2019

BAMBOO FOR PRIVACY AND EROSION CONTROL


For many years, I have let trees and brush grow on the narrow strip of ground between my front yard fence and the road.  The area is not really usable because the seasonal stream that runs through it floods, making erosion an issue.  Living so close to a dirt road also adds the problem of blowing dust each time a car passes, and the brush helps keep some of it down.  There is, of course, always a number of people curious about what the weird guy in the neighborhood is doing, making privacy an issue.  
On the downside, underbrush is not the most pleasant thing to look at.  With the trees beginning to die, and the fact that the lack leaves during winter lowers the level of privacy, this arrangement will soon cease to be of benefit.  I believe I have found the answer.

A few years ago, I planted a small start of bamboo which I ordered from a nursery company in Washington.  This species is supposed to eventually produce canes about 3 inches in diameter and about 30 feet tall.  So far, it has not quite done this.  At this point, it has spread to make an nice little stand and the largest canes are almost 2 inches and about 20 feet tall.  Each year, the new canes are a little bigger, so it may actually get to the optimum size eventually.  At any rate, it is green year round, and forms a nice, dense barrier.

I have decided to transplant some of the smaller canes to the area outside the front yard fence.  As the new starts spread and grow, it should form a nice barrier and serve as excellent erosion control.  The thick green foliage should also afford better privacy.  At the very least it will look much nicer than underbrush.

Yes, I know bamboo is invasive, though it is slower than many other invasive plants.  However, it will serve my purposes nicely and the canes can be harvested for use on the farm.  This species also produces edible shoots that can be harvested as it spreads into unwanted areas.

With all the advantages in mind, I transplanted 3 starts yesterday.  It will take a few years and some work for the bamboo to completely replace the underbrush, but hopefully the end result will be awesome.


Sunday, January 27, 2019

SOLAR PANNELS UP AND WORKING!!!!


Storm damage at the end of November, unexpectedly took me off grid earlier than expected (as stated in previous posts).  Since that time, I have been using my computer, battery chargers, etc., at my sister's house until I can get solar up and working.

Refund of my deposit from the power company was enough to purchase a 100 watt solar kit from Harbor Freight, but it could not be installed until the tree was off the house.  With that task finished a few days ago, it was time to install the solar.

Since the main thing I am using electricity for is the office, the most logical place for the panels would be on the roof near enough the office for the wires to reach.  This leads to the first real challenge.  The roof slopes to the east and west, while the panels need to face the south.  A platform would have to be built for the panels, so they could face the proper direction.  

To make the platform, I built two stands to match the angle of the roof, one for each side of the ridge.  After sealing underneath       them with roof cement, they were attached to the roof with screws.  An old door attached across the stands serves as a platform.    

With the platform up and solid, the solar panels were assembled according to instructions.  They were then attached to the platform and the cables were hooked up.  With the charge controller hooked to the battery, the input wire was hooked up, completing the circuit.  Even though the sun was almost down by this point, the panels started charging. 


I hooked it up with two batteries to add power, and with the rising sun, they began to charge nicely.  Yes, I was excited!  At the rate it was charging, the batteries would reach full charge long before evening and I would be able to use the computer at home again. With this in mind, I arrived at home with my computer later that evening only to find that my batteries were not fully charged.  I thought perhaps the panels had not put out enough, since the day had been a bit overcast.  Pushing down my disappointment, I resolved to wait until the next evening. 

Morning came and the sky was clear.  Surely there would be fully charged batteries by evening.  Not so!  Turns out that one of the batteries was bad making it impossible to charge them.  Unhooking the bad battery, allowed the good one to reach full charge quickly.  Now, I could certainly use the computer.  OR NOT!!!


The inverter I hooked up was one I had purchased a few years ago and used for a while.  It had been stored for a couple of years but still worked (or at least it seemed to).  It seemed that everything 
worked fine, except the computer and the router.  Neither of them would even come on.  Turns out that though my inverter comes on and puts out the correct voltage, it is not putting out enough amps to run anything that pulls much power.  It will now be a little while before the budget will allow for a new inverter.  Meanwhile, my computer is back at my sister's house until I can run it at home.  At my place, I simply have a little light and an expensive phone charger for the time being.  Wish me luck!! 


Sunday, January 20, 2019

STORM DAMAGE CLEANUP (part 1)

On the night of November 30, there was a storm and apparently a small tornado.  The large tree near the front of the old house ended up on top even though it had been leaning away.  The first two pictures were taken the next morning.  It really doesn't look all that bad from the outside, but looks are deceptive.  The second picture shows a little different view.

Though the house was only used for storage and was not in shape to be lived in, this mess would have to be cleaned up.  Not only was there a tree to be removed, but the wet ceiling was now on the floor and on top of tools and other things stored in that room.

First thing was to remove the sheet rock off of everything, then start moving power tools and other items that were not already destroyed.  Not pleasant, but necessary.  There was some immediate damage and there will ultimately be quite a bit of loss, but it could be worse.  

Next step was tree removal.  This was a big tree with lots of branches, not an easy task.  With most of the rafters in that room broken, being on top with a chainsaw was a little less than safe but top first was about the only way to remove it, one piece at a time.  

During this time, I was also occupied with fence building, cutting firewood and numerous other necessary activities, so this was not  a quick job.  It is also one that will continue, in one phase or another for quite some time to come.

On January 1, I began the new year by cutting up much of the top and throwing the brush and firewood off.  This was not easy, with the shaky roof and tons of small branches to trip over, but progress was made.


About a week later, I finished cutting the tree from the roof.  In the process, the main part of the tree shifted and took down the porch roof, as was expected.  With the tree gone, it is easier to see the                                                         damage.  The last picture shows how it looks inside.  If you look closely, you will notice a large tree branch hanging in what used to be ceiling joists.  It will have to come out during demolition.

A few days later, I cut up and removed the part that was on the porch roof.  Now there is only the trunk.  I will decide soon whether to try to get it sawed into planks or cut it up for firewood.

Now that the tree is off, it will be time for more inside cleanup and demolition.  This will certainly be posted in multiple parts so watch for part 2.


Saturday, January 19, 2019

OFFICIALLY OFF GRID, SOONER THAN EXPECTED!!

As those of you who have been following already know, I have been slowly working toward the day when I can tell the power company to pull the meter.  The expected time frame was at some future point, due to things like the need for a few power tools, welder, air compressor and computer.

On night of November 30, the time frame dramatically accelerated.  There was a large oak tree leaning slightly away from the house and I hadn't considered it as a potential problem.  Weather patterns here in Oklahoma, however, had other ideas.  A small tornado twisted up the tree top and uprooted the tree, placing it squarely on top of the house.  In the process, it took down the power drop cable and damaged the wall where the meter was, to the point that it could not be hooked back up.  

The house was no longer livable and used mainly for storage (the back room serving as an office) prior to this event.  Roof damage was extreme, and with termite damage below, there will be no repairs, only tree removal and eventual demolition.  With these considerations, I had the power company close my account and remove the meter.

This brings me to the point of being totally off grid.  The refund on my deposit was enough to get a solar kit at Harbor Freight, which I will install on the roof of my office area.  My computer is now at my sister's house so I can have at least limited use of it until the solar is set up.

The next step after the solar setup will be the purchase of a portable welder (ASAP) so I can weld, and run the air compressor and other tools.  This damage and lack of power tools will slow progress in some ways, and there will certainly be quite a bit of loss of storage items. 

There is an up side!  Several projects and goals are greatly accelerated.  In addition to being off grid ahead of schedule, I have greater motivation to get the portable welder that has been on the list for several years.  The process of sorting and downsizing stored items is now an immediate necessity, and the eventual demolition of the old house is a much more immediate consideration.

In short, since nobody was injured, there is some serious good even in this negative event.  I will write a post on the cleanup later.

Wednesday, February 26, 2014 (DF) ARE YOU ACQUAINTED WITH YOUR FOOD?

Do you know what you eat?  This may sound like a silly question, but I am totally serious.  This is not a question of whether you know the difference between beans and broccoli.  Though there is the possibility of eating bacon or sausage that tastes like pork but is really turkey, or eating prepared foods with hidden additives, most people have a general idea of what they are eating.  More accurately, this is a question of whether or not you are actually acquainted with the food you eat, and if so, just how closely acquainted.  I constantly reading labels on food packaging in the interest of a better awareness of what is really in the foods we eat.  The awareness we gain allows us to make better decisions where food additives are concerned, hopefully leading to better health.  With this in mind, consider that yesterday, I ate some really nice peanut butter with a very short ingredient list (peanuts and salt).  In a sense, I know this food.  I know what it is, what it is made of and that it tastes great.  As a bonus, I also know that it is not supposed to have any additives.  What I do not Know, since I didn't grow the peanuts, is what kind of soil the peanuts grew in, what fertilizers and/or insecticides were used, or how they were processed.  In short, I know something of this food but I am in no way acquainted with it.
By contrast, the eggs in my refrigerator came from my own chickens.  I know what these chickens eat, how healthy they are and some of them even hatched from eggs laid by my own chickens and hatched in my incubator.  I also know when the eggs were laid and which hen laid each of them.  In short, I not only know this food, I am closely acquainted with it.  This also goes for things like the fried chicken and okra I ate on New Years day.  The chicken was raised here on the farm, hatched from an egg laid by my hen, raised to adulthood and prepared for cooking.  I handled the whole process here.  The okra grew on Anna's farm where she worked up the soil, planted the seeds, watered the plants, picked the pods then cut prepared and froze them for our use.  As you can see, we were very well acquainted with that meal and enjoyed it all the more for that acquaintance.
I will continue to read labels, but more importantly, I will continue to be fully acquainted with more and more of my food until, eventually, I may not have to read labels at all.  With all the food additives and poor processing practices in the industry today, I strongly encourage you to consider getting better acquainted with your own food.

Saturday, January 12, 2019

NEIGBORS, FENCE BUILDING AND FIREWOOD

My neighbor contacted me back in mid October saying that he was ready to get the fence row between my property and his cleared so the fence on two sides of his property could be partly replaced and partly re-stretched.  He had scheduled a bulldozer to do the clearing (at his expense) the following week.

I had set stretch posts and bought goat wire about 5 years ago, with the intention of turning part of that fence into one side of a goat pasture.  Infections in my feet and legs had prevented me from continuing the project, for quite some time but by now I am back able to stay on my feet long enough to get some work done.  The timing was great.

Over the next few days, I took down barbed wire from the stretch which would be the new goat fence, and waited for the bulldozer.  Turns out that the bulldozer operator was a longtime friend who I have had do work in the past.  Awesome.  He did a wonderful job and worked around the line posts so I didn't have to pull and re-drive them which saved a good bit of work.

There were several trees that were too big to be pushed with a small bulldozer, so I agreed to cut them.  The neighbor needed a few ricks of wood so I traded it to him to cover my part of the clearing cost.  He had not intended for me to pay anything, so there was a bit of negotiation involved.  In the end, he accepted enough wood to cover my part of the bulldozing, then bought a couple more for cash.


When the clearing was done, the neighbor replaced the really old fence and re-stretched part of the newer fence.  I re-stretched part and replaced the rest with goat fence.  I finished my part on New Years Eve.

It is good to finally have that much of the fence finished.  Now I can continue with the rest of the goat pasture.

Sorry there aren't more photos.  I really must start taking the camera with me wherever I go.


FENCE BUILDING AND OTHER STUFF!

Over the past couple of months, I have gotten terribly behind on posting.  However, that does not mean nothing has been happening here at HareBrainFarms.

Shortly after my last post in October, things started getting a little hectic.  Between building fence, cutting firewood, storm damage and holiday preparation (and about a thousand other things), there just hasn't been much time for the computer.  It doesn't help that my computer is now at my sister's house until I can get solar panels set up (long story that will need its own post).

Please bear with me, and I will be writing some catch up posts very soon.  Thanks for your patience.

Saturday, January 5, 2019

AND JUST LIKE THAT, IT'S A NEW YEAR!!!!

Sorry there hasn't been a post in a while.  Things got really hectic here and all of a sudden, just like that it is a new year.

I really hope everyone had a Merry Christmas and started 2019 on a good note.  Hopefully, I will get some of the projects I have been working on posted and/or updated.  There are, as always, successes and challenges.  Some of those challenges also serve as delays for posting, but it is all being straightened out.

Please stay tuned for updates.

Monday, October 8, 2018

CATS ON MY LITTLE HOMESTEAD


To begin, I will say for the record that I am not a cat lover, or a cat person of any capacity.  In fact, generally speaking, I really do not like cats.  With that said, I will also state that I am not mean, or cruel to cats or any other creatures, I just prefer not to have them around me.

Now, the current state of events and what led to this point.  This story actually begins a couple of years back, when my former fiancĂ© lived here.  She is, was and will probably always be a cat person, and while here, had what I consider way too many cats (just my opinion).  There were kittens born here, most being very friendly and underfoot whenever possible.  There was one, however that did not like to be messed with and would stay as far away from people as possible.  It was nice enough when caught but really didn't like to be messed with.

When my former moved to her new place, she moved all of her cats, leaving some of them for a time, including the one that did not like people, with her mother who lives about 40 miles from me.  Later (last fall), she moved them to her place which is about another 40 miles farther from my place.  The one that did not like people promptly disappeared.  By early spring, I began catching brief glimpses of this cat at my place, first around the barn, then at the edge of the back yard, always hiding immediately when she knew she was seen.  Like them or not, I can't help having some respect for any creature with the focus and determination to make such effort to be where it chooses to be.  I didn't mind her being here, since she was not under foot and was helping with the rodent population.

In mid-July, I startled said feline while doing some work in the wood shop.  At first, I thought nothing of it but she kept hanging around so I investigated.  Sure enough, right there in my wood shop, in an old chicken nest box behind a board, there were two brand new kittens.  As soon as I left the shop, she promptly moved them to the lawn mower trailer where they would be safe (at least until time to mow the cemetery).  When mowing time came, she moved them again, this time into the old house I use for storage and office.  At this point, I am thinking that this is a temporary affliction, and that as they grow, this wild mother will teach them to hunt outside and they will return to the outdoors.  Toward this outcome, I made a point of not acknowledging them or showing interest in any way.

About a month ago, however, the mother abruptly disappeared and has not been seen since.  Whether she abandoned or was eaten by the local pack of coyotes, I may never know but the result is the same.  I am now responsible for these two adorable little razor clawed demons that follow me everywhere and have a terrible tendency to be underfoot.

Nothing in life happens without a reason so there has to be a reason that I need cats in my life.  Whatever the reason, it looks like I am stuck with cats.  I just hope they grow to be more independent and become good hunters like their mother.  If they do, at least I won't have to worry about rodent problems here on the homestead.


Wednesday, September 26, 2018

A NEW OVEN RACK FOR AN OLD WOOD COOKSTOVE FROM A REPURPOSED GATE

As I have posted previously, I am now cooking on my Grandmother's old wood cookstove.  This is not one of the big, fancy stoves.  It is small and with a small oven, but it is what my grandparents could afford early in their marriage.  My Grandmother cooked many, many large meals on this little stove, for many years.  At this point, it still does a great job, except for the oven.

Heavy usage in the past, bad storage, high humidity and the ravages of time (this stove is close to 100 years old), took such a toll on the oven rack that it is practically in pieces.  Finding a new one is out of the question, as is the hope of finding one of similar size.  Consequently, I have been thinking for awhile of how to make a new or repurposed one so I can use the oven.

I had considered modifying a larger oven rack from a modern stove, and I have a couple here to choose from.  However, this project has been on the back burner (no pun intended) for most of the summer in favor of more urgent projects.  With fall approaching, a working oven becomes a higher priority for me, and I find myself thinking of making bread and other baked goodies.

Recently, while walking past the old chicken yard, as I do several times each day, the gate caught my eye.  It is made of an end piece
of heavy livestock panel with 2 inch by 4 inch spacing.  My mind instantly shifted to baking.  

With measurements in hand, and a few minutes with a good bolt cutter, I had the makings in hand.  I cut the section of panel to width and added 4 inches to the length.  The added length to be bent down to make legs.

Using fence pliers to make the bends, and a block of wood for   stability, I proceeded to make the bend, one rod at a time, little by little, first one then another, until the extra 2 inches on each end were at a 90 degree angle.  This part took a little time of working back and forth, and this stuff is not easy to bend.  
Fortunately, my hands are large and pretty strong, otherwise I would have had to resort to other tools with more leverage or possibly heating the rods with a torch.  Either of those options would have taken more time and been a bit more of a hassle, but still quite workable.

As it is, in a relatively short time, I had something resembling an oven rack that would set on a flat surface and have 2 inches elevation.  With a few minor adjustments, it slid nicely into the oven.


As you can see from the last photo, the supports for the original rack are higher than the new rack.  Not a problem.  This oven  always had a problem with cooking on the bottom.  Everything 
would be beautifully baked on top, but not quite done on the bottom.  It was something my Grandmother contended with the whole time she used it.  I deliberately lowered the new rack to try and compensate and to make more room above for taller cookware.

With the new rack in place (this was done in early morning, before work) I could hardly wait for evening to try it out.  Biscuits are always a nice test, and the anticipation practically had me drooling all day.  With evening came the test batch, the first baking in this oven in a very long time and the first ever on the new rack.  The biscuits turned out pretty well.  Pictures of the biscuits would have been nice, but they smelled so good that I forgot to take pictures.  Maybe next time.

Lowering the rack did not fix the challenge of browning on the bottom, as I suspected, but setting the pan on top of the stove for a few minutes took care of the problem.  In all fairness to the little stove, not cooking at the bottom is not a design flaw.  I had noticed when I was setting up the stove that the little lever on the side looked a little off.  A closer look showed that the piece that is supposed to shift the heat flow underneath the oven had been put on the lever backwards when the stove was originally assembled, making it impossible for it to shift the heat flow.  At some later time, when I take it apart to replace the bolts, I will try to change that, but for now, a few minutes on the stovetop to finish the cooking is not a real inconvenience.


------UPDATE------


Friday afternoon, actual bread.  Just a simple yeast bread but the first baked in this oven in a long time.  Turned out tasty.

Yes, it is a bit large.  Normally, I would have made two braded loaves with that much dough and baked them on a cookie sheet, but it seems that my cookie sheet has disappeared or been misplaced during the past couple of years.  A cake pan makes an unusual size loaf but it works.

Now, with a cook shelter and usable oven, I will be back to baking most of my bread.


Monday, September 24, 2018

A BIT OF SHELTER FOR OUTDOOR COOKING

Outdoor cooking is a wonderful thing.  The open fire (or as is now the case, my Grandmother's wood cookstove), the fresh air and smoke, it is all quite wonderful.  As I am sure you know, even the most wondrous experiences have a downside, and in this case rain falls into that category.  I can't bring myself to complain about rain, but it does present challenges.

Most of my cooking has been done outdoors for a few years now, first on a cooking ring made of car rims, and more recently on my Grandmother's old cast iron cookstove.  Last winter, I made use of a crock pot when the weather was bad, but I really prefer a real fire.  This brings us to the need for a cook shelter.

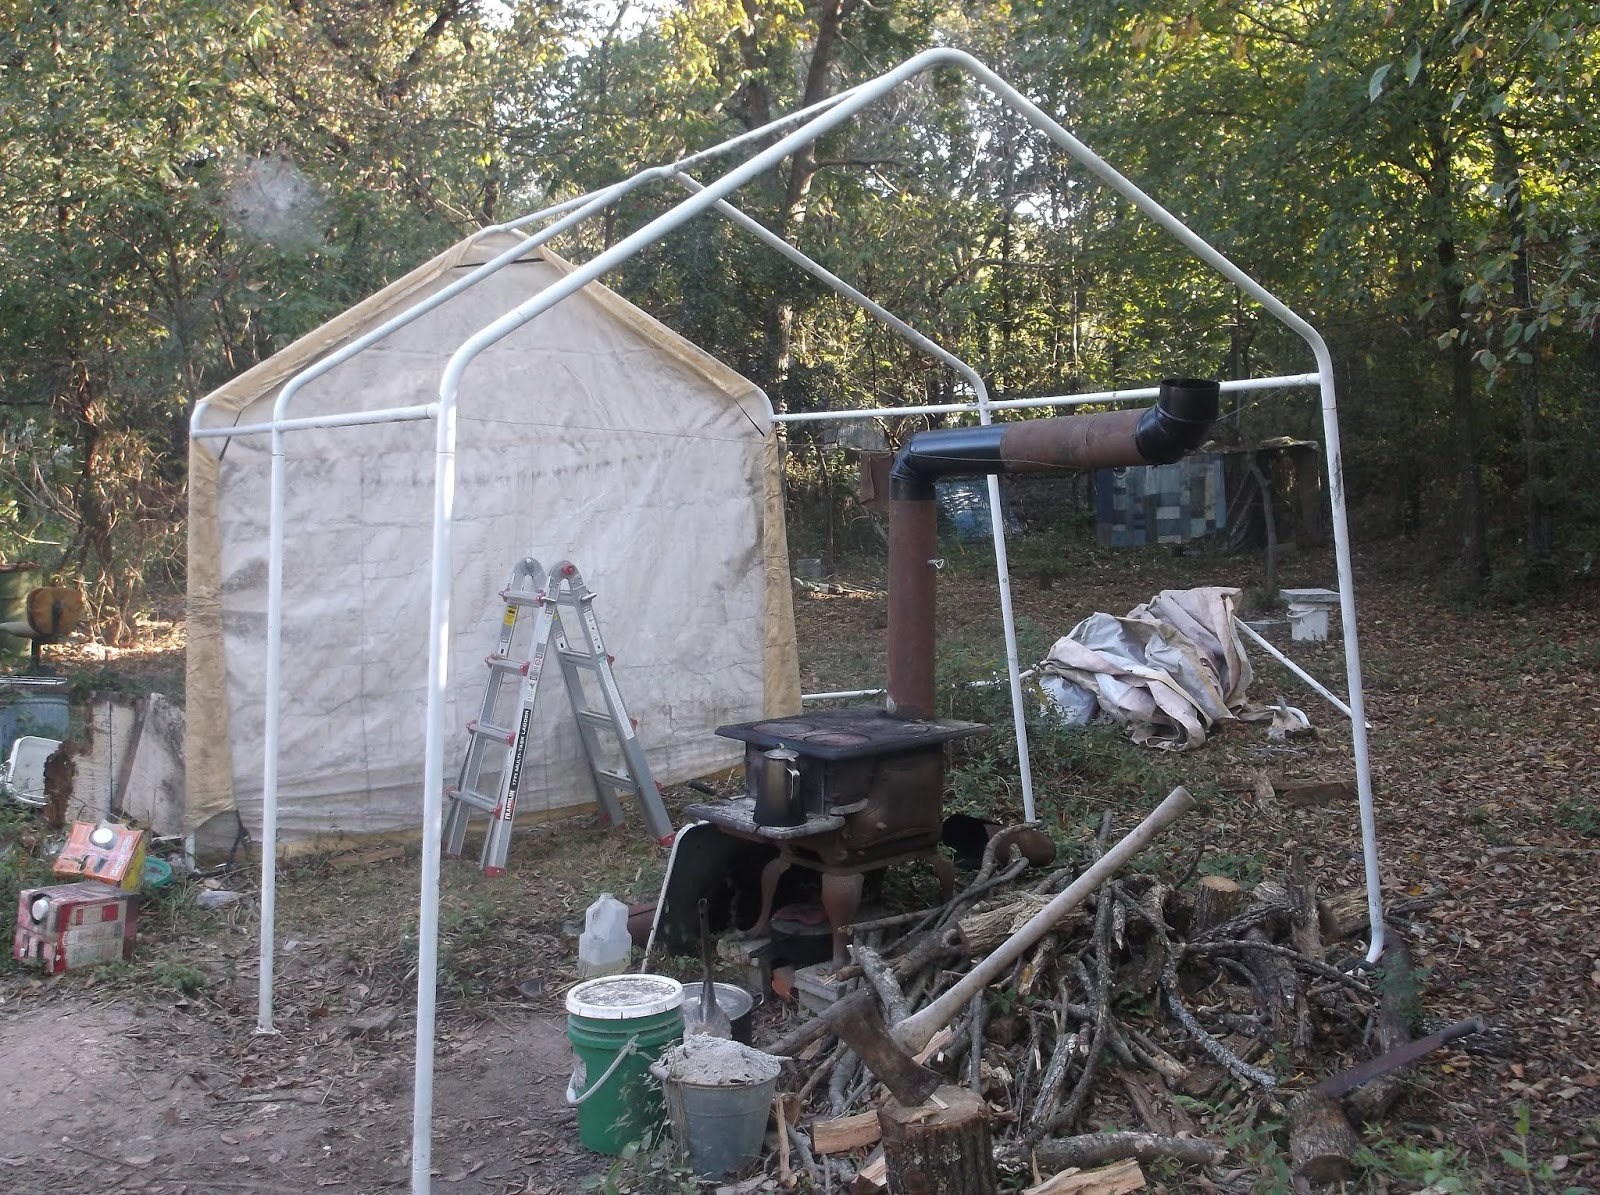
Recently, I had the opportunity to do some bartering.  Through this bartering, I acquired (among other things) a portable garage.  You know the type, the kind with a metal tubing framework covered with a heavy fabric covering, like they sell at Harbor Freight.  The covering is pretty well worn, but should hold up for a while longer, then it will be replaced with a decent tarp.  It doesn't look like much as a pile of components, but will be good once assembled.

With the framework and back end cover installed, it begins to look a bit more like a shelter.  This is only 2/3 of the frame I traded for due to the space of my cooking area as well as some terrain issues that exist near the back end of the framework that you see in the second photo.  The only real option would be to move my cook stove to a larger flat area, which would not only be quite a bit of extra work, but would also be further from my food storage and living area.  The added space would be nice, but not necessary.  The remaining components will be stored for future use after my cabin is built and I no longer need the cook shelter.


Due to circumstances beyond my control, this little project took longer than I had hoped.  My plan was to have it up before it started raining again.  That did not happen!  I found myself after work on Friday, working frantically in the rain to install the front end and the cover, thoroughly soaked in a slow steady rain.  

With the shelter up, the lack of dry wood and kindling created the next challenge.  As you can see from the smoke, the challenge was met, and I cooked the first meal under my new shelter.  I must say, it was very nice cooking in the dry while listening to the rain falling on the shelter.  With the addition of a table, it will be a pretty nice little kitchen.

With winter coming soon, the walls will also be great.  Nothing takes the fun out of outdoor cooking like a cold wind, or worse yet, a cold, windblown mix of rain and sleet.  This will be good now, with the fall rains, and even better for winter.

I hope this post gives some helpful ideas, and as always, I look forward to your questions and comments.  Now on to the next project:  making a replacement oven rack for the old stove so I can start baking again.